DIY Cable Railing!
- Janelle Payne

- Aug 3, 2022
- 5 min read
Updated: Sep 5, 2022

We planned to just "resurface" the deck. Well one thing led to another and the entire thing had to be rebuilt. After having to tear it down we saw just how open the deck could be. Midway through the renovation we had no railing and I absolutely loved how open and airy it felt, although slightly dangerous for toddlers to be running around on!
I was scouring the internet for different options that provided safety but didn't feel closed in or break the bank, enter....
Cable Railing!
I am so happy I found the company Cable Bullet and I reached out to work with them.
What makes them stand apart is just how user friendly and simple they make using a cable system. You can get a free estimate with everything you need for your project, including the tools needed to complete the installation!
In this post you will find all of the steps broken down for you to complete this project for yourself! If you are more of a visual learner you can click here to see the process of my installation on my Instagram highlight!
Products used for the cable railing for wood posts:
Boeshield T-9® Rust & Corrosion Protection: Waterproof Lubricant
Measuring tape and pencil
Clamp
First things first, design your railing!
The first thing you want to do is plan out your project! Decide how many posts you will have, the distance between them all and how many "sections/separate runs" of cable you will need. The wonderful thing about Cable Bullet is that they will walk you through this entire step with suggestions of how many posts you need and calculate all of the cable needed for your specific project, FREE OF CHARGE! This was such a huge help since I really didn't know how to get started.
I ended up placing my 4x4 redwood posts approximately 5ft apart with 10 separate "runs" of cable. ("run" referring to a single cable with one tensioner on either side) They recommend you don't span more than 20 ft for one cable to prevent sagging. Below is the rough sketch I gave them and they were able to tell me everything I would need to complete my job!

Once you have everything nailed down, place your order and then when the product arrives they will include a pamphlet with super easy-to-follow instructions to guide you through the install. Not to mention the customer service was very helpful whenever I had a question! Below I will lay it all out for you, step by step!
Step 1:

You want to start your first cable no more then 3" from the top of the post. I measured down 3" from the top and 3" up from the bottom of the post for my top and bottom cables. I wanted 8 cables total to be ran so I divided the length between those two by 7 to get my spacing for the rest, which was 4.71"
The drill guide they provide is set up for a standard of 10 cables spaced 3" apart, so if doing it this way just use their guide! I of coarse have to make everything more difficult for myself but I wanted the least amount of cables as possible!
Step 2:

Once all of the cable locations are marked on your post, take the drill guide and line the bigger holes up with the marks. In order to make sure the holes are lined up on center, loosen the two knobs on the left to adjust it on your post and tighten to hold it in place when the drill holes line up center of your post. This way you can slide it up and down the post and the hole guide will stay on center for each cable mark.
Use the 9/16" drill bit to start the holes at each spot.
Step 3:
Take a piece of painters tape and place it around the drill 1.5" back. This will be your guide for how deep you drill into your post. Go back and drill into each of the shallow holes you just made and drill them until the tape grazes the post to ensure the correct depth for your tensioners, which is 1.5".


Step 4:
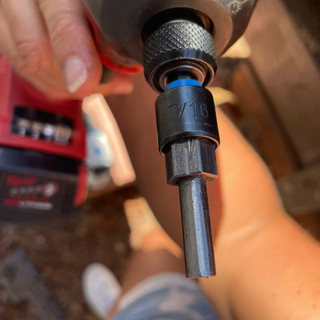
Next take the Cable Bullet driver and use it to insert a tensioner into each cable post hole. You will need a 7/16 hex socket to attach it to the driver. Once they are all in the post you can take an 11mm wrench with the cable bullet driver to adjust the placement of the tensioners, this is not necessary but it looks better to have them all facing down or up in my opinion.


Repeat these steps on the other post that will complete your run.
Step 5:
Now we are ready for the cables! Take your cable and add a lobed washer first and then a crimp sleeve. Keep the crimp sleeve right at the end of your cable and insert it into the crimping tool provided with the installation kit and turn the dial to the "on" position. Pump the handle until you feel a good bit of resistance (video on how to use crimper) then release the knob to the "off" position. When done correctly you should see a hexagonal marking around the entire crimp sleeve.


Step 6:
Put a dab of lubricant into the tensioner hole and then take the crimped end of your cable and insert it into the key hole. Use a 3/32” Allen wrench provided with the installation kit to secure the set screw. Tighten just enough so it sits flush with the opening.


Step 7:
Pull the other end of the cable tight across to the same tensioner on your other end post (**past any pass through posts, more on that below) and use the wire cutters to snip the cable 1” past the tensioner. Once the cable is cut, take the cut end of the cable and repeat the crimping process as described in Step 5. Secure in the tensioner at the same level the same way as described in Step 6 but with this side keep tightening the set screw until the cable is taught. Then go back to the other side and tighten that set screw so that the cable is very tight with little give. Their is approximately 3/4” room to tighten on each side of the cable.


***Pass through posts:
If you have a post between two end posts you will need to drill a hole with the long 3/16” drill bit directly through the post, a drill block guide is very useful for this process to ensure you stay level. Then cover each side of the pass through holes with the Cable Rail Post Hole Covers. The cables from one end post to the other will pass through these.
Step 8:

Now just repeat that process for every cable! Yes it is a monotonous job, but really very simple!! Also with every cable that goes up it looks better and better giving you the drive to keep going!! I strung this entire cable railing completely by myself with absolutely no experience with this type of project. I am very confident that anyone can do this and am so happy I can add another skill to my DIY knowledge bank!
In the end I am SO glad we decided to go with cable railing for our DIY deck build and would 100% recommend this product!! If you have any questions please feel free to reach out!
You can get your free estimate for your own cable railing here!

Be sure to use my discount code at checkout for 20% off your cable system! This code provides a 20% discount on not only the wood tensioner kits but the sleeved and masonry kits are included as well.
DISCOUNT CODE: "NAILGUN20"


Comments