Epoxy Countertops
- Janelle Payne

- Sep 15, 2022
- 4 min read


If you want a high end look that won't break the bank I have the answer for you, epoxy countertops! When I was renovating my second RV I needed countertops that were going to look like stone but be a fraction of the weight. I stumbled upon epoxy. Since then I have used this technique many times.
This is so customizable to any color palette you desire and very durable when cured.
What you will need:
Plastic mixing buckets (or solo cups!)
Paint stir sticks
Spray Paint
MDF
nail gun
clamps
Liquid Nails
Tape
Masking Paper
Heat gun/torch
gloves
sandpaper- 80 grit and 220 grit
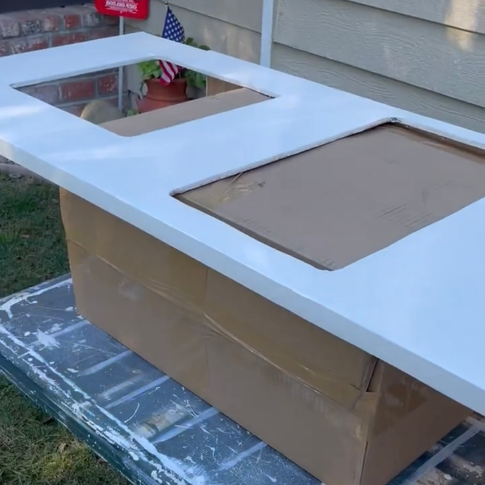
Step 1: Build your counter!
First you need to get a flat substrate. If you do not have any existing countertops you will need to build them using at least 1/2" MDF. Cut the MDF to the desired length and depth for your counter size. Next rip down an 1.5" wide piece the length of your countertop to attach to the front ledge of the counter (along with any sides that will show). Clamp and secure these together with wood glue and brad nails.
*If you have existing countertops you can skip this part. You will just need to sand your current counters with 220 grit sandpaper then clean well.
The most important thing is to make sure you are pouring over a level surface! If you have a tilt in your substrate the epoxy will slowly travel with gravity and level itself out. Having a level surface will ensure that when you pour your design it will remain that way and not be distorted over the next few hours as it hardens.

Step 2: Bondo & Sand!
If you do not want the rough edge look, just use wood filler for the gap between the ledge piece and the counter.
If you want a rocky stone look on the edges you will need bondo. Fill all the gaps with this and then smear it across the sides. Once applied take your gloved hand and "slap" the edges so that it pulls the bondo up. Let this dry for at least 30 minutes. After that take 80 grit sandpaper and smooth the top and go over the rough side pieces to remove the sharp edges. Clean well with a tack cloth.


Step 3: Paint & Prep!
Choose the undertone of the counters you want. If you want light and bright go with a white color, dark and moody maybe a black (my 2 examples at the top). I use any interior or exterior paint I have on hand and it can be in any color you want. Just paint the entire countertop as if you were painting a wall. Let this dry.
Next prep the area you will pour at. Epoxy is sticky and if you are like me, you will make a mess! Cover ANYTHING you do not want to get epoxy on because it will be nearly impossible to remove it. You also want to apply tape around the edges of the countertops and in any cut outs (ie sink cut outs) to prevent the epoxy from flowing off of the counter when you initially pour.


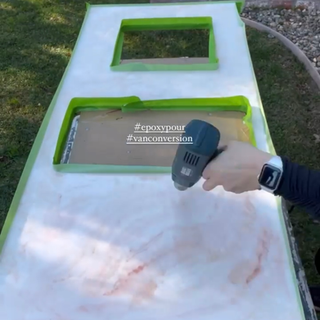
Step 4: Mix Epoxy!
When mixing epoxy you need to use 1 part hardener and 1 part resin. I bought 1 gallon of each and poured both into a large bucket and mixed them thoroughly using a mixer attachment on my drill for at least 2 minutes on a low speed to decrease the bubbles made.
Next you want to divide the epoxy into smaller cups/buckets, one for every color variation you want to add. In this example from the dark stone I did, I used 4 different cups. Once divided up add spray paint to each cup in the color you choose. Spray for about 5-10 seconds and mix thoroughly with a paint stick.
Lastly, you will pour all of these back into the original bucket, alternating pours between different colors (a little from each on top of each other until they are all in the big bucket). You can even add little squirts of spray paint randomly between pours. This is what will give you the swirls and mimic the natural stone look.


Step 5: Pour!
This is the fun part! you can pour in a swirl motion or linear depending on the look you want. As it levels out after your first pass through, go back and fill all the gaps with the remaining epoxy. Let this all level out and then on any showing edges remove the tape so that it can flow down the sides. You will want to take a gloved hand and rub the epoxy all across the sides. Next, use a heat gun or small blow torch to run across the surface where ever little air bubbles may be. You can also use the heat gun to move the colors around as desired. If you have neither you can just softly dab the air bubbles out and the epoxy will level out again. Let this sit for a couple hours.
After 2 hours you will take a paint stir stick and scrape the drips across the bottom of the ledge around the edges, sink holes, etc. Allow the epoxy to cure for at least 48hrs before handling.


Step 6: Optional Step
Once cured the epoxy is durable. For extra protection and scratch resistance I used a product from Stonecoat Countertops called "Ultimate Top Coat" You just roll it on with a brush.
Their you have it! A high end look on a budget!


Comments